blog

Laser Level How to Use and Maintain

lacer 3
lacer
lacer 2

Tool55Plus: How to Use and Maintain Your Laser Level in the U.S. Market

Laser levels have become essential tools for construction crews, contractors, and even DIY homeowners in the U.S. They provide accurate reference points for layout, alignment, and finishing work—both indoors and outdoors. At Tool55Plus, we focus on making sure our customers not only get reliable tools but also know how to use and care for them properly.

This guide will walk you through operation, safety tips, maintenance, and troubleshooting for your Tool55Plus Laser Level, so you can get maximum accuracy and extend the life of your investment.


How to Operate Your Tool55Plus Laser Level

Pre-Use Checks

Before switching on your laser level, inspect the casing and lenses for any cracks or dirt, make sure all attachments are tight, and confirm the battery is fully charged or have a spare ready.

Powering On

Press and hold the power button for a few seconds until the system runs its internal check. The laser will stabilize automatically, projecting a clean and precise beam.
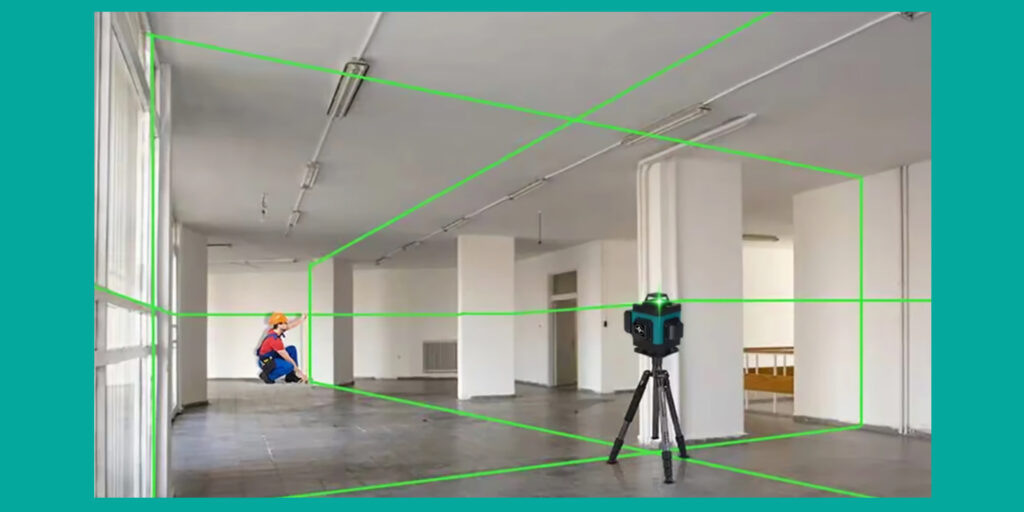
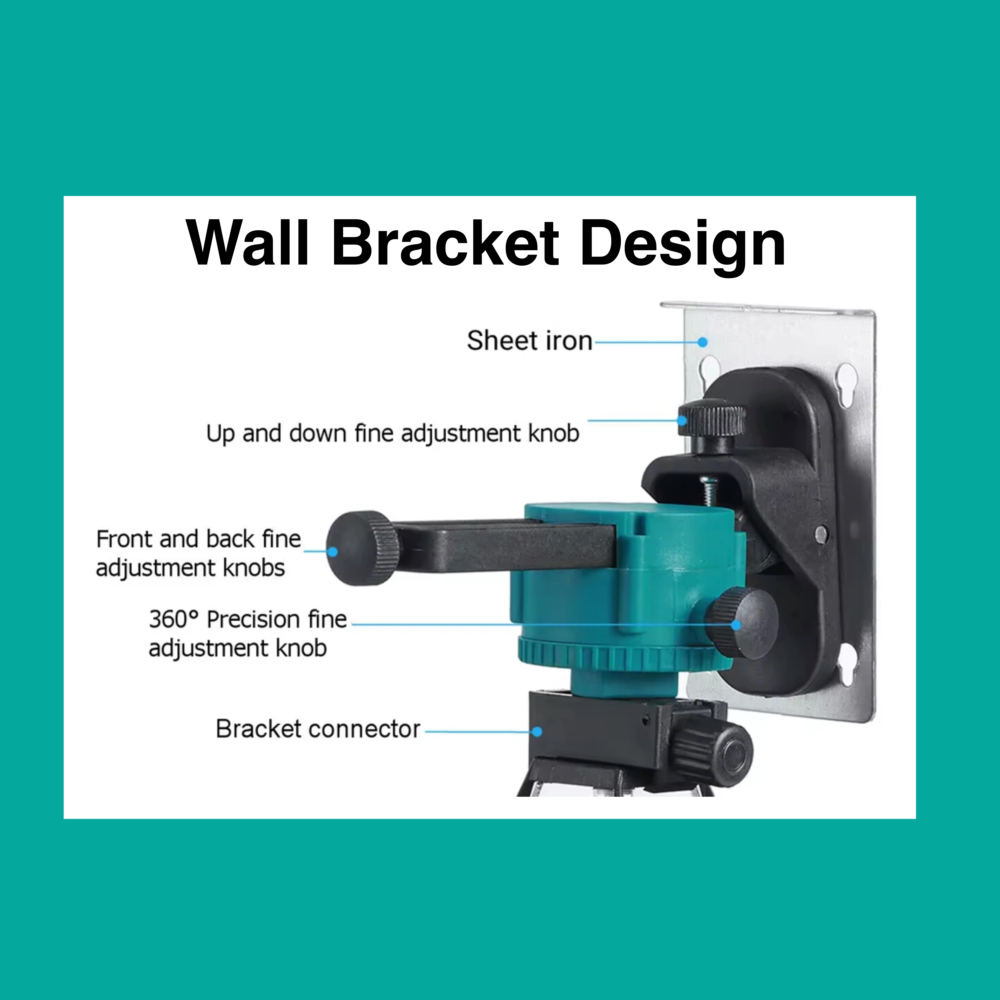
Leveling and Setup

Mount the laser securely on a tripod or a flat surface. The automatic leveling function ensures accuracy within range, and if the tool tilts too much, it will flash as a warning until you readjust it.

Using Line Modes

Depending on your model, you can select horizontal line mode for wall leveling or multi-line mode for full-room layouts and framing.


Safety Tips When Using a Laser Level

Eye Protection

Always wear protective glasses when operating the laser. Avoid looking directly into the beam and never point it at people or pets.

Battery Safety

Use the provided charger and do not allow the battery to overheat. Store extra batteries safely and away from objects that could cause a short circuit.

Work Environment

Avoid using the device in explosive or highly flammable areas. Keep the tripod stable and prevent vibrations or impacts that could affect precision.


Maintenance for Long-Term Performance

Cleaning

Clean the lens with a microfiber cloth to keep projections accurate.

Storage

Store the device in a dry, cool place. Remove the battery if you are not using the tool for an extended time and keep the unit in its protective case.

Calibration

Calibrate your laser level every six months to ensure measurement accuracy.

Battery Care

Do not allow the battery to fully discharge frequently. If storing long-term, keep it charged between 40 and 60 percent.


Troubleshooting Common Issues

Unstable Laser Beam

Check the stability of the surface, clean the lens, and tighten any loose parts.

No Power or Display

Confirm that the battery is charged and seated correctly. If it remains unresponsive, test with another battery.

Accuracy Problems

If your lines appear consistently off, the unit may need calibration.

Loose Components

Vibrations or drops can cause parts to loosen. Re-secure them carefully and contact Tool55Plus if you need replacement parts.


Frequently Asked Questions

How long does the battery last?
A fully charged lithium-ion battery can operate for several hours depending on the mode selected.

Can I use the laser level outdoors?
Yes, Tool55Plus laser levels are designed for both indoor and outdoor use, though strong sunlight may affect visibility.

How often should I calibrate my laser level?
Calibration is recommended every six months, or sooner if you notice inconsistent measurements.


Final Thoughts

At Tool55Plus, we believe precision tools require proper use and care. By following these operating guidelines, safety practices, and maintenance routines, your laser level will remain accurate and reliable for years.

Whether you are a contractor, workshop owner, or DIY enthusiast, Tool55Plus offers the reliability, performance, and U.S.-based support you need to work with confidence.

Choosing the Best Cordless Angle Grinder

grander

Choosing the Best Cordless Angle Grinder for Your Projects

When it comes to power tools, a cordless angle grinder has become a must-have for both professionals and DIY users. It gives you freedom of movement, strong performance, and the ability to cut, grind, or polish in almost any location. At Tool55Plus, we help you choose the right grinder by focusing on the features that matter most: power, battery life, disc size, ergonomics, and safety.

Why Choose a Cordless Angle Grinder?

Portability

A cordless grinder lets you work anywhere without worrying about outlets or extension cords. This makes it safer, especially in tight spaces, and saves time when moving between tasks. You can bring your grinder to job sites, garages, or outdoor spaces with ease.

Key Benefits:

  • Move freely without cords

  • Finish jobs faster

  • Work in areas without outlets

  • Reduce risks of tripping hazards


Flexibility

Cordless grinders adapt to multiple tasks — from cutting pipes and tiles to polishing surfaces or fixing equipment. Whether you are in an auto shop, construction site, or working at home, the absence of cords makes the tool more versatile and convenient.


Battery Technology

Modern lithium-ion batteries give cordless angle grinders performance close to corded models. With higher voltages (18V–36V), many grinders now run longer, stay cooler, and provide consistent power until the battery is nearly empty. Fast charging systems also reduce downtime.


Key Features to Consider

Speed

Most cordless grinders reach speeds up to 9,000 RPM. Adjustable speed controls are useful for switching between heavy cutting and delicate polishing. High speeds cut through metal quickly, while lower speeds provide better control for finishing work.


Disc Size

Disc size determines the type of job you can do:

  • 4.5 in (115mm): the most common size, good balance of power and control.

  • 5 in (125mm): stronger cutting for construction or fabrication.

  • 7–9 in (180–230mm): heavy-duty work, deeper cuts, and industrial tasks.

Choosing the right disc size ensures efficiency and safety for your projects.


Motor Power

Brushless motors are a standard in premium grinders. They stay cooler, last longer, and deliver more power. An 18V brushless motor can perform almost as well as some corded tools, making it ideal for tough applications.


Ergonomics

Comfort is essential for long jobs. Look for anti-vibration handles, slim body design, and tool-free guard adjustments. These features reduce fatigue and increase safety during extended use.


Safety Features

Modern cordless grinders include:

  • Soft start for smooth power-up

  • Electronic brakes for quick stops

  • Anti-restart protection

  • Safety clutches to prevent kickback

  • Dust protection to extend motor life


Compatibility

Ensure your grinder works with multiple attachments such as cutting wheels, grinding discs, polishing pads, and wire brushes. The more compatible it is, the more versatile it becomes.


Choosing the Right Grinder for Your Work

Project-Based Selection

  • Metalwork: High RPM and durable discs.

  • Masonry: Dust-protected motor and mid-size discs.

  • Woodwork: Lightweight, variable speed grinder with good ergonomics.


Frequency of Use


  • Daily Use: Choose a durable, high-power grinder with long battery life.

  • Occasional Use: A mid-range grinder provides enough performance at a lower cost.


Power vs. Portability


Balance weight and performance. Light grinders are easier to handle for overhead work, while heavier models offer more torque for tough materials.


Budget


Cordless grinders range from entry-level models under $100 to professional-grade tools over $250. Higher prices often bring stronger motors, advanced safety features, and longer-lasting batteries.


Safety and Maintenance

Safety Gear

Always use goggles, gloves, and protective clothing. Secure all guards and handles before working. Disconnect the battery when changing discs.

Handling

Grip with both hands, secure your workpiece, and move the grinder smoothly. Avoid pressing too hard — let the tool do the work.

Maintenance

Clean the tool after every job, store it in a dry space, and check the battery regularly. Replace worn discs and follow the manufacturer’s maintenance guidelines to keep your grinder performing for years.


Final Thoughts

Choosing the best cordless angle grinder depends on your projects, frequency of use, and budget. Look at speed, motor power, disc size, and safety features before making your choice. Trusted brands with warranty support — like Tool55Plus — ensure your investment delivers both performance and reliability.

With the right grinder, you’ll enjoy freedom, precision, and durability for every project.


Drill Driver vs. Impact Driver: Key Differences, Benefits.

gallery 2
drill web

When shopping for power tools, one of the most common dilemmas is: Should I buy a drill driver or an impact driver?
At first glance, they may appear similar, but their power, purpose, and ideal applications are not the same. This guide highlights the distinctions, strengths, and when to use each tool, so you can make the right choice.


What Is a Drill Driver?

A drill driver is an all-around tool designed for both drilling holes and driving screws.

  • Operation: Delivers steady rotary power for smooth, controlled drilling.

  • Typical uses: Perfect for home projects such as assembling furniture, woodworking, and minor renovations.

Advantages:
✔️ Multi-functional — works for drilling and fastening
✔️ User-friendly — great for beginners
✔️ Allows accurate drilling

Limitations:
❌ Lower torque compared to an impact driver
❌ Less efficient for heavy-duty fastening jobs


What Is an Impact Driver?

An impact driver is specialized for jobs that require high torque and extra driving power.

  • Operation: Uses a hammer-and-anvil mechanism that delivers powerful bursts of rotational force.

  • Typical uses: Excellent for driving long screws, tightening bolts, and working with dense materials like hardwood or metal.

Advantages:
✔️ High torque output for demanding tasks
✔️ Drives fasteners quickly and efficiently
✔️ Perfect for professional construction and automotive work

Limitations:
❌ Not intended for precision drilling
❌ Noisier, with more vibration, which can cause fatigue


Comparing Drill Driver and Impact Driver

FeatureDrill DriverImpact Driver
Power/TorqueLow to medium, good for lighter tasksVery high, great for heavy fastening
PrecisionHigh, ideal for drillingLower, best for driving screws
FunctionalityMultipurpose: drilling + fasteningSpecialized: fastening & loosening
Noise/VibrationSmooth and quieterLouder, with stronger vibration
Best ForDIY projects, woodworking, furniture assemblyConstruction, automotive, metalworking

Which One Should You Choose?

  • For home projects and DIY → Go with a drill driver, it’s versatile and easy to use.

  • For professionals in construction or automotive work → An impact driver will save time and effort on tough jobs.

  • For the best of both worlds → Having both tools gives you flexibility: precision drilling from the drill driver and raw torque from the impact driver.


Pros and Cons Recap

Drill Driver

Pros

  • All-purpose tool: drilling and fastening

  • Easy to control

  • Quiet and smooth operation

Cons

  • Limited torque for heavy-duty tasks

  • Not as fast for repeated fastening

Impact Driver

Pros

  • Delivers high torque effortlessly

  • Excellent for driving long screws and bolts

  • Great for construction and automotive projects

Cons

  • Not precise for drilling holes

  • Louder, with stronger vibrations


FAQ: Drill Driver vs. Impact Driver

1. Can an impact driver completely replace a drill driver?
No. While it excels at fastening, it doesn’t provide the precision needed for drilling clean holes.

2. Can I drill with an impact driver?
Yes, if you use hex-shank drill bits and only in softer materials, but don’t expect neat or accurate results.

3. Which tool is better for beginners?
A drill driver, because it’s more versatile and easier to handle.

4. Is it worth owning both tools?
If you only do occasional DIY, a drill driver is enough. For professionals or frequent heavy-duty work, having both is the most efficient choice.


Final Thoughts

  • For general DIY and home use → Pick a drill driver.

  • For heavy-duty, professional work → An impact driver is the way to go.

  • For maximum flexibility → Owning both tools is the smartest long-term investment.


How to Choose the Right Impact Wrench for Lug Nuts

tool55plus heavy duty 3/4" impact wrench 21v brushless motor – 2000nm max torque

How to Choose the Right Impact Wrench for Lug Nuts

Picking the right impact wrench for lug nuts can be tricky. With so many sizes and torque levels available, using the wrong one could mean stripped nuts, broken studs, or wasted time. In this guide, we’ll break down lug nut sizes, wrench drive options, and the factors that help you choose the perfect tool for the job.


What Are Lug Nuts?


Lug nuts are the steel fasteners that hold your car’s wheels onto the axle. Their main job is simple: keep the wheel securely in place while the vehicle is in motion. A loose or improperly tightened lug nut can cause dangerous wheel detachment — which is why choosing the right wrench is so important.


Common Lug Nut Sizes


Lug nut sizes vary by car make and model. Here are the most common thread and socket sizes:

Metric Sizes

  • M12x1.25 → Found in many Japanese cars (Toyota, Honda, Subaru). Offers fine threading for strong grip.

  • M12x1.5 → Popular across Honda and Toyota sedans. Easy to install and reliable.

  • M14x1.5 → Common in SUVs and trucks (Ford, GM). Extra strength for heavier loads.

Imperial Sizes

  • 7/16-20 → Found in older American cars. Fine threads for secure hold.

  • 1/2-20 → Standard for Ford, Jeep, and light trucks. Strong and durable.

  • 9/16-18 → Used in heavy-duty trucks for high load strength.

Socket (Hex) Sizes

  • 17 mm → Smaller cars, often European/Asian brands.

  • 19 mm (3/4”) → Mid-size sedans and passenger vehicles.

  • 21 mm (13/16”) → Larger SUVs and trucks.

Seat Types

  • Conical (Tapered) → Most common type. Cone-shaped bottom locks securely.

  • Ball (Rounded) → Found in some European cars. Smooth alignment.

  • Flat (Washer) → Flat-on-flat surface for a secure fit.


What Is an Impact Wrench?


An impact wrench is a power tool that delivers short bursts of high torque, perfect for loosening or tightening lug nuts quickly. Most have a square drive that connects to sockets of different sizes.


Common Impact Wrench Drive Sizes


  • 1/4-inch drive → Light-duty, 100–150 ft-lbs. Too weak for lug nuts.

  • 3/8-inch drive → Medium-duty, 150–300 ft-lbs. Good for smaller fasteners.

  • 1/2-inch drive → The most common for cars. 300–500 ft-lbs. Ideal for lug nuts.

  • 3/4-inch drive → Heavy-duty, 500+ ft-lbs. Used in trucks and industrial work.

  • 1-inch drive → Over 1,000 ft-lbs. Strictly for heavy machinery and big rigs.

👉 Recommendation: For most passenger cars, a 1/2-inch impact wrench is the safest and most versatile choice.


Key Factors to Consider


  • Nut Size: Match the drive size of your wrench to the socket you need.

  • Torque Specs: Check your vehicle manual (usually 80–150 ft-lbs for cars). Don’t exceed the required torque.

  • Vehicle Type: Cars → 1/2”; SUVs/trucks → 3/4”; heavy trucks → 1”.

  • Frequency of Use: DIY? Go lighter. Professional shop? Get more power and durability.

  • Battery Life: Cordless tools need enough runtime (18V–24V for professionals).

  • Tool Weight & Balance: A well-balanced wrench is easier to use for long jobs.

  • Safety Features: Look for LED lights, auto shut-off, and overload protection


FAQ


Q: Can I remove lug nuts with a 1/4-inch impact wrench?
A: No. It doesn’t have enough torque.

Q: What’s the best size for cars?
A: A 1/2-inch impact wrench covers most passenger vehicles.

Q: Can I use hand sockets with an impact wrench?
A: No. They can crack under force. Always use impact-rated sockets.


Final Thoughts


Choosing the right impact wrench for lug nuts ensures safety, efficiency, and tool longevity. For most people, a 1/2-inch drive with 300–500 ft-lbs of torque is the sweet spot. Bigger trucks and industrial vehicles may need 3/4-inch or 1-inch drives, but for everyday drivers, the half-inch is all you need.

Best Tips for Extending Power Tool Battery Life

tool55plus battery pack (21v 4.0ah)


Best Tips for Extending Power Tool Battery Life

Power tool batteries are one of the most important — and expensive — parts of your equipment. Taking care of them not only saves you money but also keeps your tools running at peak performance. Here are the best methods to extend their lifespan and get the most out of every charge.


Everyday Tips for Longer Battery Life


  • Keep Charge Between 20–80%
    Lithium-ion batteries last longer if you avoid full discharges or charging to 100% all the time.

  • Protect From Water & Sun
    Moisture and direct sunlight can damage internal components and shorten lifespan.

  • Store Smart
    Keep batteries in a cool, dry place (59°F–77°F). Never store them fully discharged.

  • Use Regularly
    Idle batteries degrade over time. Recharge every few months if not in use.

  • Avoid Fast Charging
    Quick chargers create heat that wears out batteries faster. Use slow charging when possible.

  • Clean Terminals
    Dirt on contacts reduces efficiency. Use a dry cloth or isopropyl alcohol to keep them clean.

  • Use the Right Charger
    Always charge with the manufacturer’s recommended charger to avoid overheating and voltage mismatches.


Professional Tips for Maximum Battery Health


  • Cell Balancing
    Advanced chargers ensure all cells charge evenly, preventing premature failure.

  • Thermal Management
    Use cooling fans or insulated cases when working in extreme heat.

  • Diagnostic Tools
    Contractors use battery analyzers to detect problems early, like cell imbalance or reduced capacity.

  • Charge Rate Management
    Stick to standard charge rates for consistent long-term performance.

  • Firmware Updates
    Some modern packs allow updates that improve charging efficiency and extend battery life.


Why Battery Care Matters


Extending battery life isn’t just about saving money — it’s about:

  • Efficiency: Consistent performance and less downtime.

  • Reliability: Reduced risk of failure during critical jobs.

  • Sustainability: Fewer replacements mean less waste and environmental impact.

  • Savings: Batteries are costly — the longer they last, the better your ROI.


Battery Basics: What to Know


  • Average Lifespan: 300–500 charge cycles. Lithium-ion typically lasts longer.

  • Compatibility: Always match the right battery to the right tool.

  • Temperature Effects: Cold reduces capacity; heat accelerates degradation.


Quick FAQ


Q: How do I know if my battery needs replacing?
A: Watch for reduced runtime, overheating, slow charging, or visible damage.

Q: Can I leave batteries charging overnight?
A: Only if your charger has an automatic shut-off.

Q: Do all chargers work with all batteries?
A: No. Always use the charger made for your specific battery type.

Q: What about extreme temperatures?
A: Heat causes swelling, cold reduces performance. Always store within the recommended range.


Final Thoughts


Taking care of your power tool batteries is one of the smartest investments you can make. With just a few habits — like avoiding deep discharges, using the right charger, and storing properly — you’ll get more life, more power, and more value from every battery you own.

How to Choose the Right Electric Impact Wrench

tool 55 plus 16

 How to Choose the Right Electric Impact Wrench for Your Job

When it comes to automotive work, construction, or heavy-duty repairs, choosing the right tool makes all the difference. An electric impact wrench not only saves you time but also gives you the safety and accuracy you need to get the job done right.


Why Choosing the Right Wrench Matters


Every bolt and nut requires the right amount of torque. Using the wrong setting can either leave the fastener loose or damage it with too much force. With the right impact wrench, you’ll work faster, safer, and with fewer mistakes.


Key Factors to Consider


  1. Torque Range
    Make sure the wrench covers the torque level your job requires. As a rule of thumb, use it between 20% and 100% of its rated capacity. This ensures accuracy and extends the life of your tool.

  2. Application
    Not all jobs are the same. Tightening a car engine requires different torque than building a steel frame. Always check the type of material, bolt size, and project requirements.

  3. Manual vs. Electric

    • Manual: more affordable, no batteries needed, but less precise and more tiring.

    • Electric: digital, fast, and highly accurate. Many stop automatically at the programmed torque, making them ideal for professional use.

  4. Ratcheting Mechanism
    A ratchet lets you work in tight spaces with minimal movement. Instead of swinging 60–180 degrees, you only need a short handle turn, saving both time and energy.

  5. Drive Size
    The drive size determines how much torque you can apply and which jobs you can tackle. Larger drives handle heavier applications.

  6. Ergonomics
    A comfortable, non-slip grip allows you to work longer without fatigue. The best models are designed to reduce strain on your wrist and arm.

  7. Power Source

    • Corded: constant power supply, perfect for workshops and long jobs in one place.

    • Battery-powered: portable and versatile, ideal for fieldwork or remote locations. No cords, no tripping hazards—just keep spare batteries on hand.

    •  

Advantages of Electric Impact Wrenches


  • Time-saving: up to 3x faster than manual tools.

  • Digital accuracy: set the torque, and the wrench stops automatically.

  • Safety: prevents over-tightening and part damage.

  • Smart features: some models record torque data for quality control.

  • Comfort: quieter and lighter than pneumatic or hydraulic options.


Final Thoughts


Investing in the right electric impact wrench means investing in efficiency, safety, and professional results. If you want speed, precision, and ease of use, an electric model is the smart choice for your toolbox.


Shopping Cart